Spring Boot OAuth 如何使用 Mock Server
開發 Web 服務時,使用者的登入與驗證一直都是重要的課題,其中 OAuth 也是常被討論的部分。雖然 OAuth 已經相當成熟,但是 Spring Boot 的文件裡,使用 OAuth 的相關資訊通常都比較零散。
本文紀錄我學習 Spring Boot / Spring Security + OAuth 過程中的理解與心得
目標
希望用 OAuth Code Grant Flow 登入 Google 帳號,並且在開發過程中能夠使用 Mock OAuth Authorization Server,分辨登入不同的登入者,給予有差異的權限
保存 User 的密碼一直都是服務端的麻煩事,對使用者來說,重新創建新帳號也同樣麻煩。我打算要架給自己用的簡單服務,最直覺的想法就是把管帳號這件事情委託給既有的大公司,只需確認登入者的 email 是否在白名單以內就好。於是 OAuth/OpenID 就是可接受的方法。
其次,在開發週期我希望能夠用假的 OAuth Authorization Server 提供登入功能,而非使用 Google/Github 之類的真實服務。
這樣的好處在於有個可預測結果的開發環境,寫測試會比較簡單(雖然我還想不到該有哪些測試)。開發環境也可輕易重製,任何新進成員都能快速進入狀況(哪來的新進成員)。自己學新東西,反正也沒有時程壓力,倒不如按照老派的實踐,一步步慢慢做下去。
話說回來,使用真實的 Google/Github 會有其他好處:既然開發都是拿 prodcution 來運作,照理最容易早期發現早期治療(I don’t always test my code. But when I do, I do it in production)。何況 OAuth 已經相當穩定,不使用 Mock Server 也有道理。但是站在學習的出發點,仔細地區分開發與產品的環境並且使用 Mock Server,的確讓我在這個課題學到不少原本沒想到的東西。
以下從最簡單的地方開始,每次改變一個小的變因,逐步地過渡到最終目標。
- 使用 OAuth 之前的準備動作,了解相關知識
- 先跑起官方的範例,連上 Github Server
- 接著換掉 Github 改用 Google Server
- 透過手動設定 ClientRegistration,理解該如何新增一個客製的 OAuth Authorization Server
- 在自己的 Spring App 裡面實作官方範例做過的事情
- 在自己的 Spring App 接上 MockServer
- 探討登入後的下一步
用圖片來表示就是這樣

限制
- OAuth 有四種授權流程,我只聚焦在最常見的 Authorization Code Grant Flow
- 本篇盡可能講解最小限度的實作,釐清核心概念
- Spring Boot 的版本
- Spring Boot 的 API 可能會改變,所以內文講的東西可能會跟你所用的版本稍有出入
- 原本使用 2022/10/20 釋出的 Spring Boot 2.7.5
- 後來改成了 2023/01/20 釋出的 Spring boot 3.0.2
- 版本升級之後只有幾個地方有 Migration,核心程式碼的邏輯原則上不變
- 使用 5.8.x(9f6b38bf33c) 的 Spring Security Samples
前期準備
準備工作:理解 OAuth 規格
要使用 OAuth,當然要先有基本的理解。網路上已經有許多完整的解說,譬如鴨七已經詳細地提供了 OAuth 2.0 筆記。這邊只說明最基礎的部分

舉例來說,我們會把檔案存在 Google Drive,接著希望讓自己寫的 Web App 去取用這個檔案,此時
- 放的檔案就叫 Resource
- 存放檔案的地方就是
Resource Server - 擁有 Resource 的人,就是 Resource Owner,又稱
User - 驗證有沒有資格存取檔案的伺服器,就是
Authorization Server - 我們要實作的 Web App 就是
Client
常常會發現 Authorization Server 跟 Resource Server 是同一個(好比接下來會用到的 Mock OAuth Server),但是在 OAuth 的規範裡,這兩者可以是完全不同的 Server
每個角色之間比較詳細的互動流程如下

流程圖的 2, 6, 8, 10 步驟的註解,代表的是我們需要提供給 Spring Security 的資訊,內容會因實作使用的伺服器而有差異
- 在 Client 填入 authorizationUri
- 讓 Client 知道要打開哪個頁面開始進行 OAuth
- 在 Authorization Server 填入 Authorization callback Uri
- User 同意之後,Authorization Sever 要開啟我們的 Spring Web App
- 資訊會夾在 uri 裡面
- 在 Client 填入 tokenUri
- Spring Web App 從這個 Token uri 用 authorization code 換回 Access token
- 在 Client 填入 userInfoUri
- Spring Web App 用 access token 取得 Resource,在我們的使用情境該 Resource 就是 User Info
只要填完正確的資訊(當然除了這些 Uri,另外還有 Secrect key 之類的字串),Spring Security 的 OAuth 實作就能跑完 2 ~ 11 步驟,我們不用操心太多。
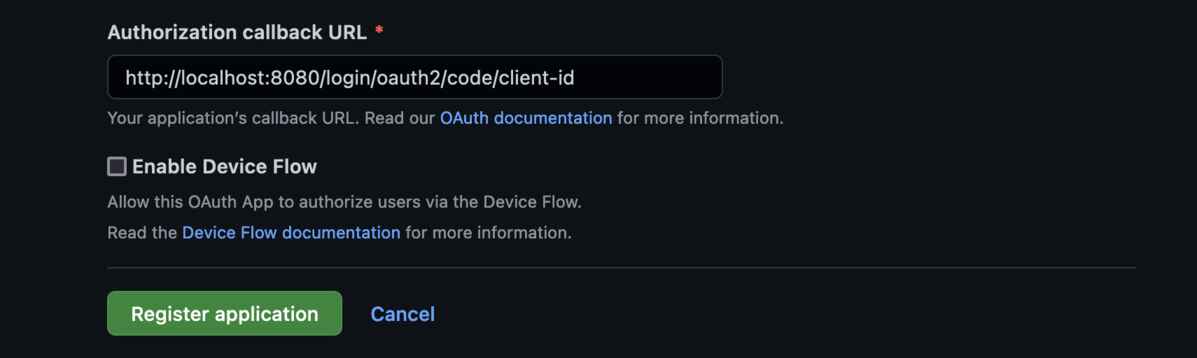
在詳細解說該怎麼填充之前,先來設定 Authorization Server。假設 Client (我們的 local spring app) 會跑在 https://localhost:8080, 以 Github 跟 Google 為例,設定的方法如下
準備工作:設定 Github OAuth
管理你的 Github OAuth apps,請到 https://github.com/settings/developers
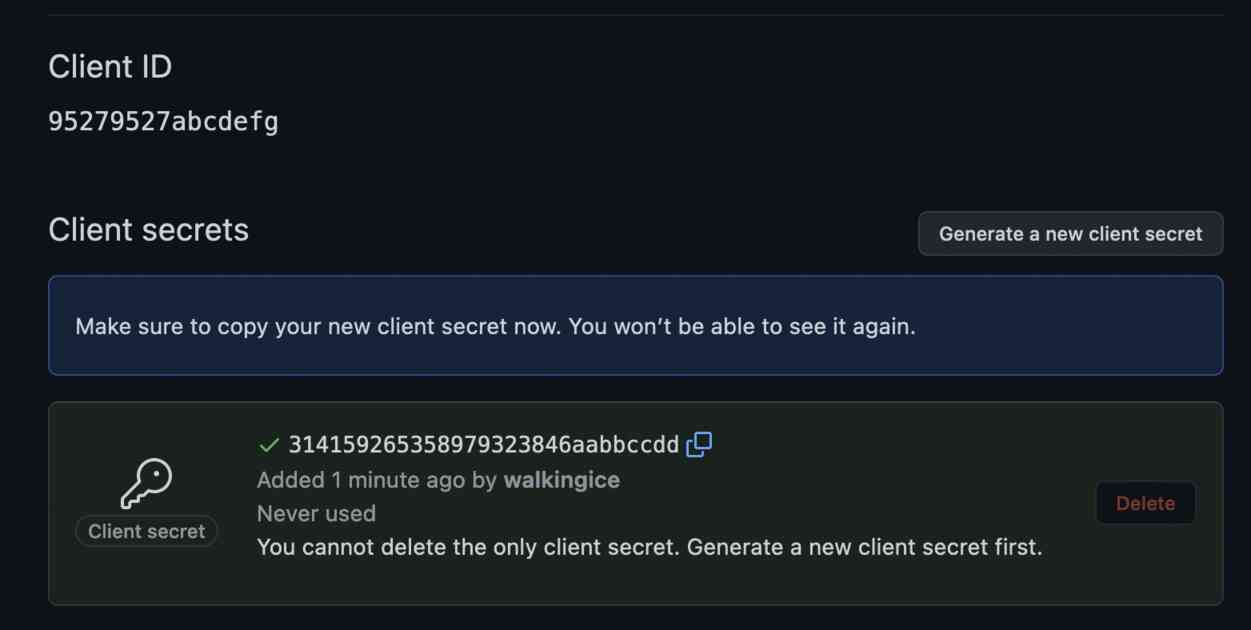
點下 Generate a new client secret,並且記下這兩個字串 (ps. 這些是經過我亂改的假字串,請勿照用)
- Client ID:
95279527abcdefg - Client secrets:
314159265358979323846aabbccdd
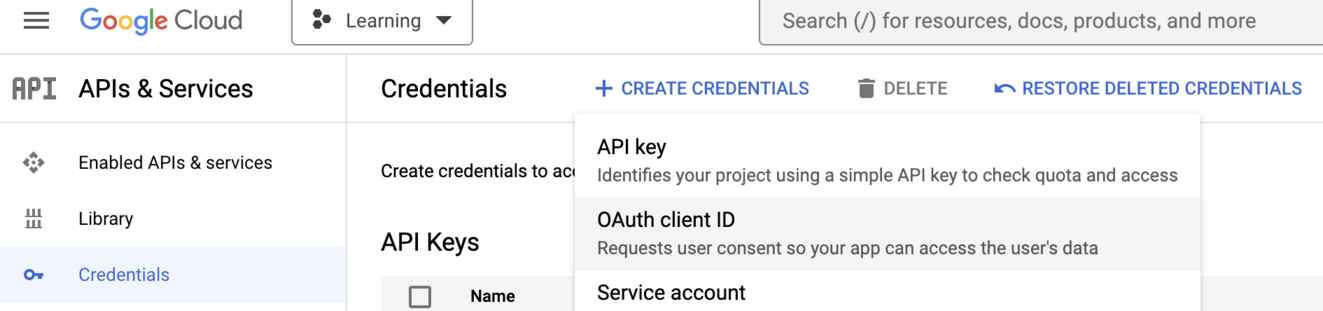
準備工作:設定 Google OAuth
- 要設定 Google OAuth,請到 https://console.cloud.google.com/apis/credentials
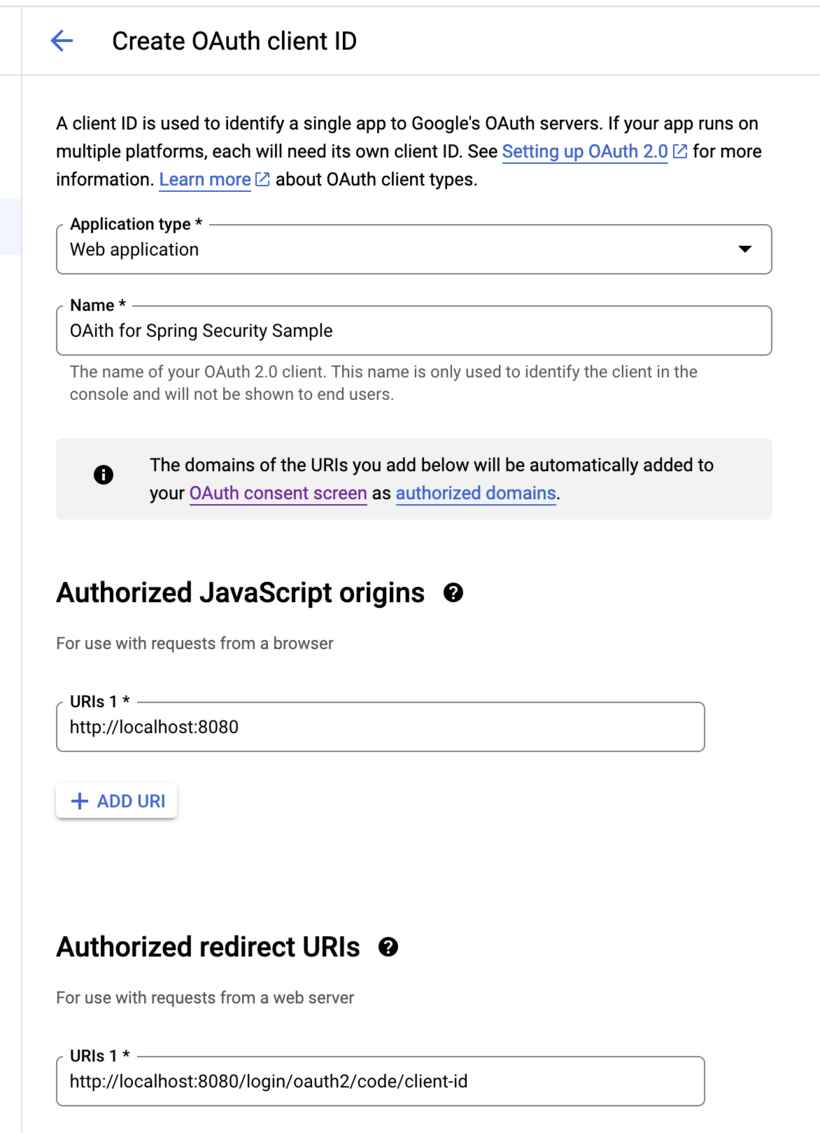
- Appliecation type 是
Web application - Authorized Javascript origins 填入
http://localhost:8080,Google 會判斷 Request 是不是來自這個 Origin - Authorized redirect URIs 填入
http://localhost:8080/login/oauth2/code/client-id,這就是流程圖第六步會用到的 Callback Uri
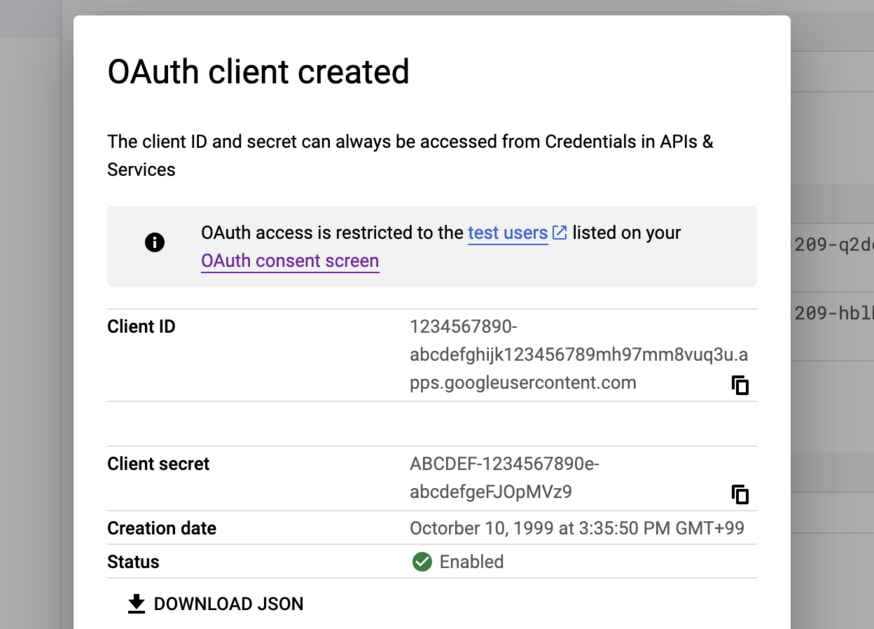
同樣地記下這兩個字串 (ps. 這些是經過我亂改的假字串,請勿照用)
- Client ID:
1234567890-abcdefghijk123456789mh97mm8vuq3u.apps.googleusercontent.com - Client secret:
ABCDEF-1234567890e-abcdefgeFJOpMVz9
使用 Spring Boot 官方 sample
前期的準備工作都已經完成,接著從官方範例 開始練習。
之所以選用官方範例,是我假設官方範例會用一個最簡潔且符合原始框架設計的實作,套用 OAuth。畢竟框架的存在就是要減少鄉親重複造輪子的可能性。
反正我也不清楚怎樣才算比較好的 Practice,與其從網路上東抄西抄,不如抱緊官方大腿,跟著長官的指揮走。
用官方範例連接 Github OAuth

首先抓下官方範例包山包海的源碼,現在只需要專注看 /servlet/spring-boot/java/oauth2/webclient 即可
在這個目錄執行 ./gradlew bootRun 接著打開 http://localhost:8080/ 就能看見範例頁面 – Hello World 完成了!
點入任何一個頁面就會被導至登入頁面,登入頁面能看到一個 Login with OAuth 2.0 / Github 的連結 – 當然它還動不了。只是一張皺了的 ACE,因為我們還沒發功啊
現在打開 servlet/spring-boot/java/oauth2/webclient/src/main/resources/application.yml,把先前準備的 github client-id 跟 client secrect 填進去
1 | @@ -13,8 +13,8 @@ spring: |
重跑一次 bootRun,這次就能順利地使用 Github 登入,並且看到自己的一些 Github repo 資訊了
理解官方 Sample 提供的資訊
從 application.yml 得知,預設情況下 Sample 就是使用 Github 當作 OAuth provider。那麼 Sample 能夠提供我們什麼資訊? – Spring Boot App 啟動 OAuth 的最小實作,這又包括了
- 如何 Configure Spring Boot App,開啟 OAuth 功能
- 如何開始 OAuth 流程
- 如何使用 OAuth 登入後的成果
如何 Configure to enable OAuth
打開 SecurityConfiguration.java 就能看到這段
1 | http |
內容相當直覺,除了 public 之外的 Request 都會要求登入,導向自動產生的登入頁面。利用 oauth2Login 跟 oauth2Client 啟動 OAuth 功能,傳遞進去的全部是預設值。
如何開始 OAuth 流程
簡而言之:一切開始於預設登入頁面的 Github 連結開始。
預設登入頁面的實作在 DefaultLoginPageGeneratingFilter.generateLoginPageHtml 裡面。如果 OAuth 已經啟動而且有了足夠的 Client 資訊,便會插入連結 /oauth2/authorization/{registration-id},以我們的例子就是 http://localhost:8080/oauth2/authorization/client-id。
只要點下這個連結,該 Request 最後會被 OAuth2AuthorizationRequestRedirectFilter.doFilterInternal 捕捉,透過 redirect 開始進行 OAuth
換句話說,如果要 customize 登入頁面,只要在該頁面放上 /oauth2/authorization/{registration-id},就是 OAuth 的起始點。
如何使用 OAuth 登入後的成果
打開 OAuth2WebClientController.java 裡面有這麼一段
1 |
|
官方範例演示如何從登入後返回的 attributes 裡面拿到必要的資訊,接著呼叫 retrieve 取得 JSON response(屬於你的 Github repo 資訊),然後轉成字串印到網頁上,換句話說,http://localhost:8080/annotation/explicit 頁面的內容是從這邊產生的。
但我們要的其實沒那麼多,我們真正想知道的是拿到了什麼 Authentication 資料結構,從這邊判斷登入的人是誰。這部分比較複雜,最後再解釋。先聚焦在如何一步步抽換實作,等這些都做完了再來考慮如何完成我們最開始的目的:確定登入者是不是我們預期的 User
官方範例連接 Google OAuth Server

從 Github 換成 Google 相當簡單,只要修改 application.yml,把這幾行資訊換掉即可完成。
1 | --- a/servlet/spring-boot/java/oauth2/webclient/src/main/resources/application.yml |
重啟 bootRun 便能用 Google OAuth 登入。
你可能會覺得奇怪,怎麼 yml 檔案裡面有重複的 client-id?
1 | client: |
這是官方範例檔寫得不夠好。較上層的 client-id,應該取作 registration-id 會比較好。提供「某個 OAuth Authorization Sever 的資訊」的資料結構在 Spring Security 裏面叫 ClientRegistration。如果我們希望同時提供 Google, Github 兩種登入方式,就要提供兩組 ClientRegistration,並且指定不同的 Registration Id,執行 OAuth 的流程,才能透過 Registration Id 知道現在正在用哪一組
所以 yml 檔可以寫成這樣,同時用兩個區塊來比較會比較清楚
1 | client: |
進入下個章節以前,就讓我們來動手改改看,把那個取名不好的 client-id 改成 my-registration,透過這個過程理解 Registration Id 的影響
首先先改 yml 檔
1 | client: |
如同前述,OAuth Login 開始的進入點是 /oauth2/authorization/{registration-id},如果你有自訂 Login 頁面,這時候就要改用 /oauth2/authorization/my-registration。不過 Sample 是用預設的 Login 頁面,它會自動幫我們生出正確的連結。
回想一下在 Google / Github 的 OAuth 頁面設定的 Authorization callback uri:http://localhost:8080/login/oauth2/code/client-id
最後面的那個 client-id 其實就是 registration id。在流程圖的 Step 6,從 Authorization Server 返回 Client,Client 會從 /login/oauth2/code/{registration-id} 的格式取出 ID,用來判斷接著該用哪組 ClientRegistration 繼續下去
於是現在要再次進入 Google/Github 的 OAuth 設定頁面,把 callback uri 改成 http://localhost:8080/login/oauth2/code/my-registration
此外,Sample 的 Controller 也有部分寫死 Registration Id,也必須要一併改變才能讓 Sample 正常運作。(如果是自己的 Web app,大可忽略這部分)
修改 OAuth2WebClientController.java
1 | --- a/servlet/spring-boot/java/oauth2/webclient/src/main/java/example/OAuth2WebClientController.java |
以及 RegisteredOAuth2AuthorizedClientController.java
1 | --- a/servlet/spring-boot/java/oauth2/webclient/src/main/java/example/RegisteredOAuth2AuthorizedClientController.java |
接著重啟 bootRun 即可
手動設定 Google Registration

在前面的實作,只要在 application.yml 填入從 Google/Github Server 拿到的 client id 跟 secret 就能運作,是因為 Spring Security 已經針對常用的服務,準備好必要的資訊。也就是說,Spring Security 已經備妥好幾組的 ClientRegistration。
這些東西都放在 CommonOAuth2Provider 裡面,譬如
1 | public enum CommonOAuth2Provider { |
這個 Provider 會產生 ClientRegistration 給 Spring Security 使用,在 application.yml 指定的 provider google,就會採用上面那組 Google Builder 產生的 Registration。
它預設提供了 Google, Github, Facebook 跟 OKTA。然而,根據業務需求,隨時可能要新增一個 ClientRegistration,我們原來的目的「使用自己的 Mock Server」便是一例。現在就來假裝 Google 的欄位不存在,而我們要支援這個新服務
「透過 application.yml 從 CommonOAuth2Provider 找出可用的 ClientRegistration」這是 Spring Security 的實作,官方範例利用這部分,簡化需要撰寫的程式碼。由於我們打算新增自己的 OAuth Provider,現在開始屏棄 application.yml,全部自己手動來做
首先要注入自己的 ClientRegistrationRepository,現在打開 servlet/spring-boot/java/oauth2/webclient/src/main/java/example/SecurityConfiguration.java,透過 @Bean 來手動生成
1 |
|
內容大多抄自 CommonOAuth2Provider,除了 redirectUri clientId clientSecret 這三樣東西,原本該從 application.yml 載入,現在改成寫死在程式碼裡。這是為了解說方便,實際上的 production code,當然改回從設定檔決定內容會是比較合理的做法
跟前一小節相同,別忘了改 OAuth2WebClientController 與 RegisteredOAuth2AuthorizedClientController 裡面的 client-id 為 my-registration
同樣地重啟 bootRun,就能用手動注入的 Google ClientRegistration 進行 OAuth 登入
小結
官方範例至此給了許多幫助,透過保證會動的範例,逐步修改的過程中我們理解到了
- 如何設定 Google/Github 上面的 callback uri
- 如何產生自己的 ClientRegistration 增加新的 OAuth Authorization Server
- 如何設定自己的 Spring web app,使其支援 OAuth
- 該透過怎樣的連結,啟動 OAuth 登入
有了這些基礎的知識,可以回到自己的 Spring web app 開始實作 OAuth 了
用自己的 Web App 連接 Google OAuth

這邊就不囉唆怎麼創建一個基本的 Spring Boot Web App,會嘗試用 OAuth 的人應該都已經很熟悉這部分。
第一步要產生 ClientRegistration。雖然可以在 SecurityConfig 那邊透過 method clientRegistrationRepository 指定 repository,但我還是比較偏好用 @Bean 的方式注入,這樣我可以在 Production Build 排除掉下一個章節會加入的 Mock OAuth Server。
以下程式以 Kotlin 為例,先來寫個 class MyOAuth2ClientRegistrations 提供 ClientRegistration
1 | object MyOAuth2ClientRegistrations { |
接著找個地方注入 ClientRegistration
1 |
|
這些完成後,最後一步就是設定 SecurityConfig,啟動 OAuth
1 |
|
oauth_login_success 跟 login_fail 是登入成功/失敗的預設頁面,非必須。現階段寫個簡單的 Controller,然後直接 render 成功或失敗的字串就好。
因為我想要有自訂的登入頁面,所以放進了 loginPage("/login"),我們可以這麼實作它
1 |
|
編輯 template 的 login.html
1 | <div class="img" th:each="oauthPath: ${oauthPaths}"> |
未來只要新增 RegistrationType,就可以輕易地增加不同的登入按鈕
讓自己的 Web App 連接 Mock OAuth

經過千山萬水終於走到最後一步,具備足夠的基礎知識之後可以開始接 Mock Server。
準備 Mock Auth Server
首先要選擇合適的 Mock Server,我最後選擇的是 navikt/mock-oauth2-server
- 看起來功能滿完整,也有提供 docker 等等許多不同的啟動方式,相當溫馨
- 它也是個 Sprint Boot App,可以輕易地整合進現有的專案
- 只要從 mvn 下載相依性 jar,隨時可以輕易寫個簡單的 App 啟動 Mock OAuth Server
- 可以在自己的 Spring Web App 裡面開一個開發用的子目錄跑 Mock OAuth Server,每次的 git pull 也連同 Mock Server 的開發環境一起準備妥當
先開一個 project,接著把 mock server 加入 dependency。Gradle 的設定檔如下 (有些東西我也忘了當時怎麼找出來的,就如實記下,供讀者參考)
1 | import org.jetbrains.kotlin.gradle.tasks.KotlinCompile |
接著寫個簡單的啟動器
1 | package my.spring.dev.oauth |
執行這個 spring app 之後,它會在 4040 port 跑起 Mock Auth Server。我設定了一個 Callback,在流程圖的 Step 23 回傳的 JSON 檔案裏面,額外增加 username 跟 email 兩個欄位。用途就留到最後一個章節再解釋
跑起 mock server 之後,可以打開 http://localhost:4040/default/.well-known/openid-configuration,貼心地列出了你需要填進 ClientRegistration 的資訊。
1 | { |
自己的 Web App 增加 Mock 的 ClientRegistration
基於前面已有的實作,我們只要增加一個 ClientRegistration 就能輕易支援 Mock Server
1 | object MyOAuth2ClientRegistrations { |
記得還要在 LoginController 裡面的 oauthPath 補上 RegistrationType.Mock.id,就能補上 Mock server 的登入連結。
到這邊就算完成了
小結
從官方範例開始,逐步做到這裡,很清楚地理解應該要新增哪些東西,有哪些必填資訊,於是要接 Mock Server 就變成小菜一碟。
然而,前面的文件都漏掉一個非常重要的環節沒提,其實也是我卡關思索最久的地方,而且是最要緊的最後一步
「該怎麼使用 OAuth 的結果?」
官方範例直接用 access token 去 Resource Server 撈東西回來,但這不是我原始目的。我想要的是「知道登入的人是誰,給予相對應的權限」。
前面講的東西大多是逐步的實作過程,下一個章節再專心解釋,該怎麼使用 Google/Mock 回傳的東西,來完成最初的目標。
OAuth 登入後產生可用的 User
在開始之前先說結論:「OAuth/OpenID 登入之後,應該要產生不同於 Form Login 的 User,而是要針對 OAuth/OpenId 的 User,每個 Controller 給予符合權限的操作」
這句看不懂沒關係,知道這個大方向,把下面幾節看完就可以了。
Form Login 的情況
談 OAuth 之前,先回到最基本的表單登入,也就是最常見的輸入帳號、密碼登入。討論這個過程,很常可以看見以下的流程

User 嘗試打開某個需要權限的頁面,Spring Security 會捕捉到該 Request,交給 AuthenticationManager 做後續的處理。存密碼的事情交給 PasswordEncoder,又透過 UserDetailsService 找出登入的 UserD 資料結構,放進 Authentication.principal 裏面成為 Authentication 的一個欄位,接著把 Authentication 存進 SecurityContext。於是在 Controller 我們很常透過存取 SecurityContext 來判斷權限
1 |
|
正如前述,auth.principal 就是 UserDetailsService 回傳的 UserDetails。
換句話說,完成 Form Login 之後,我們就能拿到 Authentication 以及能提供 User 詳細資料(包括權限) 的 Authenticon.getPrincipal()
OAuth Login 的情況
OAuth 也有一個實作 AuthenticationProvider 的類別,叫做 OAuth2LoginAuthenticationProvider。附帶一提,前面的互動流程圖,正好被 OAuth2LoginAuthenticationProvider.authenticate 實作了一遍,只要看該 method 就能看完高階的 OAuth flow。當然,Spring Security 在底層塞入各種情況的實作,有興趣的人可以慢慢追。
該 Provider 的底層會用到的其他 Class 來完成工作,包括一個 DefaultOAuth2UserService,Service 的 method loadUser 就是流程圖 Step 11,會回傳資料結構 OAuth2User。DefaultOAuth2UserService 之於 OAuth2User,就相當於 Form Login 的 UserDetailsService 跟 User。
要做的事情就變得清晰許多:我們需要實作一個類似 UserDetailsService 的東西,針對 Google OAuth 登入的結果,回傳一個 GoogleUser 的資料結構。
翻閱網路上的文件可以看見不同做法,但是用到的不少 Class 都已經被 Spring Security 標註為 deprecated,撰寫此文的當下,文件的建議是採用 Delegation 的做法
於是我們要做的事情有兩個,一個是產生要放進 Authentication.principal 的資料結構,另一個是能產生該資料結構的 Service
先來客製化一個 OAuth2User 當成放進 Authentication.principal 的東西
1 | class MyGoogleUser(private val oauth2User: OAuth2User) : OAuth2User by oauth2User { |
接著注入一個 OAuth2UserService
1 |
|
如此一來,在 Controller 裡面拿到的 auth.getPrincipal() 就是 MyGoogleUser
OpenID Login 的情況
需要特別說明 OpenID Login。OAuth 的登入過程中,ClientRegistration 會指定 scope,如果 scope 裡面包含 openid 這個字串,Spring Security 在 loadUser 的部分會走另外一個實作,採用 OidcUserService (Oidc, for OpenID Connect 1.0) 而非 OAuth2UserService,詳情我沒有深入研究,應該跟 OpenID 的規格有關。
而且我選的 Mock Auth Server 正好就會回傳這個 scope,也因此上一節所注入的 OAuth2UserService 並不會對 Mock Server 起作用。我們必須要針對 OpenID 提供另一份類似的實作
1 | // 這次我選擇在 Service 那邊決定該用哪種 Authority |
另外也要注入 OidcUserService
1 |
|
如此一來,在 Controller 裡面拿到的 auth.getPrincipal() 就是 MyMockUser
Controller 裡面使用 User
還記得前面說過的結論?「OAuth/OpenID 登入之後,應該要產生不同於 Form Login 的 User,而是要針對 OAuth/OpenId 的 User,每個 Controller 給予符合權限的操作」
- FormLogin 會拿到 UserDetails
- Google OAuth Login 會拿到 MyGoogleUser
- Mock OAuth Login 會拿到 MyMockUser
所以 Controller 裡面要這麼做
1 |
|
簡單來說,就是針對不同的 Principal 的 Class type 做出不同的處理
感想
我之前一直陷入錯誤的思考方向,總認為我要注入某個轉換器給 DefaultOAuth2UserService,讓它可以產生一致的 UserDetail 資料結構,這樣 Controller 就不用處理各種情況。糾結在此,卻怎麼也找不到 Spring Security 是否提供的類似注入點。
後來念頭一轉:Form Login 跟 OAuth Login 本來就是不同的事情,不應該要生出相同的 UserDetails。有些資訊本來就不會出現在 Google 登入後的帳號,硬是要變成同樣的資料結構也滿怪的。想通了這點就豁然開朗,安心地新增 MyGoogleUser。
我想有些網站在 OAuth 登入之後,還要你產生一個新帳號,大概就是希望你再產生一個類似 FormLogin 的 UserDetail,解決 Controller 那邊邏輯分散的問題。雖然這樣的實作方法也有它的道理,但我就是不想要存太多敏感資訊,才沒選這個做法。
在 Kotlin 裡面,要避開 Controller 處理各種不同 User 的麻煩之處,其實也滿簡單的,針對 Principal 寫幾個 extension function 來用,就能維持 Controller 的邏輯清晰。
又或著,設計更抽象泛用的 User 資料結構,讓它處理不同的登入來源,也是一種可行的做法。
總結整篇文章的心得
- 要增加新的 OAuth Server,就要想辦法提供額外的 ClientRegistration 給 Spring Security
- 在 Login 頁面增加符合格式的連結,使用者就可以開始用 OAuth Login
- 注入 OAuth2UserService/OidcUserService,並且回傳客製化的 User 資料結構 – 這就是完成 OAuth login 會拿到的成果
- Controller 針對不同的 User 做不同的處理 (ie: 權限)
- 剩下,就是 Spring Security 的事了
最後 User 的那塊卡關最久,是我個人的理解心得。不過我是 Spring Boot 新手,或許有理解錯誤的地方,歡迎各方前輩給予指教。
一開始只是想著要用 Mock Auth Server 滿足阿宅的微薄尊嚴,沒想到在看文件的過程中產生愈來愈多疑問,甚至買了本 Spring Security 的書來看。也大致 trace 了一遍 Spring Security 關於 OAuth 登入的程式碼,反覆設下 debug break point 觀察流程,最後還是倚靠讀源碼的老狗把戲。
Spring Boot / Security 是好東西,它也不斷地在演進,可惜官方文件總是缺了些完成度或是跟不上新版本,網路上的教學文章多著重單一細節而少提宏觀架構,也可能因為版本不同而跑不起來。於是剛入門的階段會覺得黑魔法一大堆,雖然網站會運作,但是自己有點不心安。然而反覆閱讀源碼,過了一個階段之後就會突然懂官方文件講的是哪些東西。
話說回來,文件不就是要減少看源碼的時間嗎?寫文件真是不容易的事情啊